


|
|
|
|

|
| Modeling- versus Animation Mode
|
|
|
| See - "Moving Objects or Textures"
|
|
|
| Rotating Objects, Facets, a Point Selection or Object Axes
|
| The tool window gives you all the methods to rotate a marked object selection. This can be done either with help of the mouse or by directly inputting rotation angles. To rotate the selection with the mouse in a viewport window, move the mouse to the right or top while pressing and holding the left mouse-button. If the mouse is moved to the left or below the rotation is in the opposite direction. The rotation-angle about which you rotate the selection is displayed simultaneously in the "Angle of Rotation" box. There, you can also input the rotation-angles directly. Then operate the <Rotate> button to apply the rotation. The <Clear> button next to <Rotate> sets all angles back to 0.
|
|
|
| Rotation About the World-Axes
|
|
|

|
| Select the |
|
|
| Reference Point of Rotation
|
| If you rotate about the world axes you have two options for the reference point that defines the center of the rotation:
|
| · |
| · |
|
|
| The crosshairs option is not available in Animation Mode. In an animation you always need a traceable reference point and corresponding rotation axes you can refer to in the course of the animation. These reference axes systems are always defined by the object's own object axes or the object axes of a parent object, if movements are inherited in a hierarchy. For instance, you can use Group Objects in an animation to serve as movable reference points for rotations.
|

|
| Example: In the left picture you see 4 wheel objects that were selected for a rotation. For the reference point of rotation the crosshairs option is selected and the crosshairs moved into the center of the 4 wheels. Now, if you click into the viewport and move the mouse, the selection will be rotated as a whole about the crosshairs center (picture in the middle).
|
| The illustration on the right shows the result, after rotation about the object's own axes center has been selected instead. All marked objects rotate simultaneously about their own object axes center.
|
|
|
| Rotation About the Object-Axes
|

|
| Select the |
|
|
| Reference Point of Rotation
|
| · |
| · |
|
|
| spatialple: In the illustration you see a model of a space station. All elements of the space station are hierarchically subordinated to the big spherical object in the center. We want to rotate the space station about its longitudinal axis. This would be almost impossible, if we had to perform this with rotations about the world axes, which are aligned parallel to the spacial cube of the CyberMotion world. But if you choose the object axes for the "Axes of Rotation" then you simply need to select the y-object axis of the spherical parent object of the space station hierarchy and the space station will be rotated automatically about its longitudinal axis.
|
| Rotating about object axes systems is really essential, especially in all situations, where the animation of joints is involved, for instance, when animating robots or the skeletons of characters.
|
|
|
| The <Lign up to world axes> button rotates all marked objects so that the object-axes line up with the world-axes. This matches with the initial orientation the object had when first generated.
|
|
|
|
|
| Effect on Following Path (only in Animation Mode)
|
| Every time you rotate an object in Animation Mode then automatically a new rotate key is created, or, if a key already exists on this frameposition, it is updated. Now, if you are moving backwards in the animation because you want to adjust the alignment of an object at a particular frame position, then you can decide via the two buttons depicted above, if only the selected object is to be re-aligned or if the whole following movement path is also rotated together with the object. This function is extremely useful every time when you want to transfer animation data from one object to another. Suppose, for instance, you have animated a walking character. You want to create a second copy of this character walking in another direction. To achieve this you only have to copy the character - all animation data will be copied with the model data. Afterwards you simply need to move the copy of the character in "Move Object" mode together with its movement path to a new starting position. Then - here in "Rotate Object" mode - you just rotate the figure, again together with its movement path, so that it faces into a new direction. If you play now a preview animation you can see that the second figure really walks with the copied animation data from the first character from a new starting point into a new direction. You did not even had to step into the complex animation routines a single time to achieve this.
|

|
| Example: A Boeing has been moved about 3 key positions straight forward. We moved back in the timeline to the second keyframe.
|

|
| Now we activate the second button "Rotate Movement Path with Selection". Then we rotate the Boeing anti clockwise about 45° together with its movement path. In the illustration you can clearly see how the complete following movement path is bend with the rotation and that the plane is moving now in a new direction. What is demonstrated here with a single plane object can also be applied to whole hierarchies. For instance, to move a character hierarchy that consists of many bones and the skin object - along a complex movement path, you could first animate a complete simple walking cycle of only two steps. This basic walking cycle you could copy in the animation editor multiple times one after the other, in Relative Mode, to let the character walk a considerable part of the way straight on.
|

|
| Then, here in the "Rotate Object" menu, you move back to the starting point of the walking sequence. Move forward in animation time in several steps and rotate the character together with its remaining movement path again and again in the desired direction until the movement course has been completed. See the example in the illustration above. An animated character walks straight on along a street. Then, to let the figure walk over the street, the character and its movement path simply has been bent towards the street. On the other side of the street, the remaining path has been bent again so that the character walks again parallel to the street. All in all just a few seconds were spent to guide the figure over the street.
|
|
|

|
| If you rotate an object in Animation Mode, then automatically a key is generated. This key records a rotation axis, about which the object is rotated, so that the object axes that were recorded in the previous keyframe will align with the object axes in the current frameposition, and a corresponding rotation angle. There are always to possible directions to perform a rotation, e.g., the pointer of a clock can rotate clockwise or anti clockwise. When a keyframe is generated always the shorter angle of the two choices will be recorded. In Animation Mode you can read this angle in the "Angle to Previous Key" box. You can edit this angle, for instance, to reverse the rotation or to let the object rotate multiple times around itself.
|
| Example: You want to animate a propeller so that it turns a hundred times around its longitudinal axis. Select the propeller object and choose the corresponding object axis for the rotation. Then use your mouse to rotate the propeller - you need only rotate it a little bit, so that a key is generated with the rotation axis and an initial angle. Only then, when a key has been already recorded, the "Angle to Previous Key" parameter will be enabled and you can input a new angle. For each revolution you have to add 360° (max. 100000°), so for a hundred revolutions 360° * 100 = 36000° is the correct value.
|
| Note - if you move back in time before this keyframe and there you rotate the propeller again, then automatically new keyframes will be calculated, first with the new rotation axis and angle to rotate the object from the previous keyframe orientation to the current orientation, and, simultaneously, a new axis and a corresponding rotation angle is calculated for the directly following keyframe, to rotate the object from the just changed orientation in the new keyframe to the next following keyframe orientation. This simply means that the previously made angle adjustments for the 100 revolutions of the propeller would have to be re-entered for the following keyframe again.
|
|
|
| Reverse Rotation
|
| As mentioned before, when calculating the angle that rotates an object from a previous keyframe orientation into the current orientation, always the shorter angle of the two possible rotation angles is chosen. If, for instance, you rotate an object clockwise about 270° and then start a preview you will recognize, that the object will rotate anti clockwise about 90° instead. To correct this you can input the reverse angle directly for the "Angle to Previous Key" parameter or just press the <Reverse Rotation> button, to let the program do the work for you. The <Reverse Rotation> function will even convert multiple rotations correctly into the opposite direction.
|
|
|
|
|
|
|

|
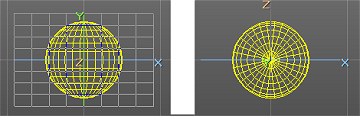
| On operating the "Rotate"-<Texture> index tab the content of the tool window changes to that indicated in the illustration above. Instead of a bounding box enclosing the object, a grid is now drawn representing the texture or bitmap with their corresponding texture axes.
|
|
| Use the "Select Texture/Bitmap"-select box to decide whether you want to rotate the texture axis for a procedural texture or the texture axis for one of the bitmaps assigned to the object. Supposing you have chosen a bitmap for a selected object in the material dialog then this bitmap will also show up in the "Select Texture/Bitmap"-select box and you can select it for work. A grid similar to that depicted above appears. The dimensions of the grid correspond to the dimensions of the bitmap. The size of the grid and the respective bitmap can easily be adapted to your needs in the "Scale Texture" work mode. To be able to reposition the texture change to the "Move Texture" menu. Here in "Rotate Texture" work mode you can adjust the direction of the bitmap projection by rotating the texture axes. The rotation will always be executed about the center of the texture axes. You can rotate about the world-axes or about the texture axes just the same as when rotating objects. The direction of the projection can easily be verified by the direction of the Z-axis, which is perpendicular to the bitmap grid. On the basis of the Y-axis you can determine where the top or the bottom of the bitmap is located. Finally, the X-mark on the X-axis shows the right side of the picture.
|
|
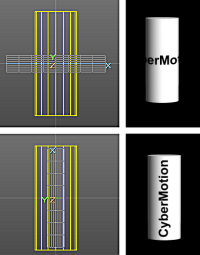
| In the illustration above you can see an example for a bitmap that should be projected vertical along the cylinder. At first the bitmap is aligned horizontally. After rotation through 90 degrees around the Z-bitmap texture axis the bitmap is correctly projected along the cylinder's longitudinal axis. Likewise, you can also rotate procedural textures. Simply choose the corresponding texture axes system in the select box.
|
| All buttons and parameters have the same functions as in "Rotate" <Object> work mode. The <Origin> button realigns a rotated axes system along the 3D world-axes.
|